
Triggers and Publishing
Triggers
Triggers define when a specific conversation should show up on your website. You will need at least one trigger in your web amp to make the conversation run. From there the conversations can be internally linked and run that way or you can define different conversations to show up on different pages.
You might want to start the conversation ‘Welcome’ on the homepage of your website, but once the users get to your Patients page, you want another conversation, specific to that subject, to appear. This is what triggers are for.
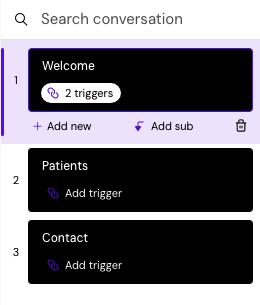
You define triggers by clicking 'Add trigger' on a selected conversation in the conversation panel on the right.
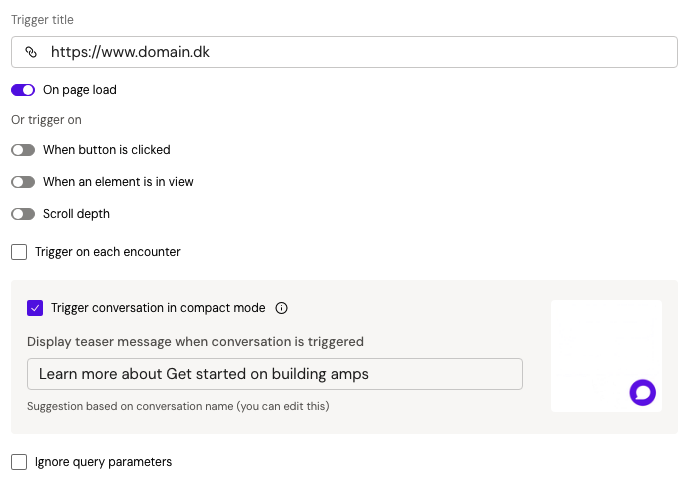
First add the URL for the page where you want this conversation to be triggered on - it could be www.domain.dk or www.domain.dk/patients.
You have different options in terms of how/when the conversation will be triggered on that URL
‘On page load’ means that the conversation will be triggered as soon as the page of the website loads.
‘When button is clicked’ means that when a user clicks a specific button on the website, the conversation will trigger. Be aware that if the button links to a different page, this will not work.
‘When an element is in view’ means that you can trigger a conversation when the user is viewing a certain part of the website.
‘Scroll depth’ means that the conversation will trigger when the user scrolls down your page and hits a certain percentage of the page length.
If selecting 'when in view' and 'when button is clicked', you will need to use the ID (#) of the specific element from the website.
Your amp can also trigger conversations in either compact (default) or full view. Compact means that a little message will appear next to the chatbot icon and the user will have to click it to start the conversation. Full view means that the chatbot will automatically open, when the conversation is triggered and start to run.
Publishing
The publish dialog is found in the top right corner. To make it easy, we have provided all amps with a test domain. This is a domain hosted by Amplify and should only be used for testing purposes.
To publish to the test domain, simply check the checkbox and click ‘Publish to selected domains’.

If you hover over the domain, you can also see two small buttons, one for editing domains and one for opening the domain in a new window. For custom domains, you will also have the option to delete the domain.
For you to see your amp, make sure that you have configured a trigger. Once the trigger is defined, publish the amp again and reload the test page.
You can get the test URL by opening the deploy popup on the edit button and copying the URL or by opening the test page in a new window and copy the URL from there.
Custom domain
Most often, you will want your amp out to live on your own website or some kind of custom domain. This is possible with a script snippet.
Click the ‘add new’ button in the Publish popup to see the full deploy overlay. Add your custom domain in the URL field and copy the script snippet. Place it before the </body< tag on your website and publish the site.
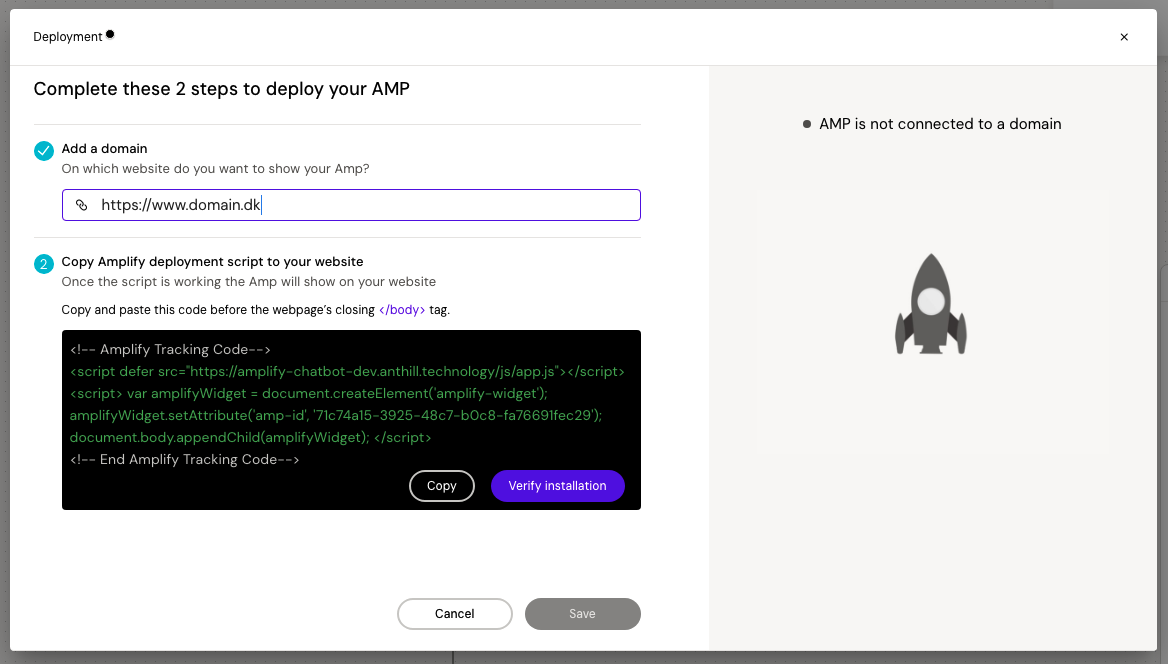
Validate the connection and save the domain. If the validation fails, the script might not be published to the website yet or might be placed in the wrong location.
Make sure to setup the triggers for the custom domain to trigger the conversations on your website.
Multiple amps on same domain
It is also possible to host multiple amps on the same custom domain. It could be that you have one amp that guided the user around your page and content, but have a different amp that you want to host on your contact page.
The ways to do this, is as following:
Add your custom domain to your first amp. Make sure that you are adding in the root/orgin, such as www.domain.dk
Paste the script into your website
Setup triggers for your conversations on your origin or subpages.
Deploy the first amp to your origin domain
For the second amp, the process is similar, but you do not need to add the script this time.
Add your custom subdomain to your second amp, such as www.domain.dk/contact
Setup triggers for your subpage. This amp can only be triggered on www.domain.dk/contact.
Deploy the second amp to the custom subdomain.